
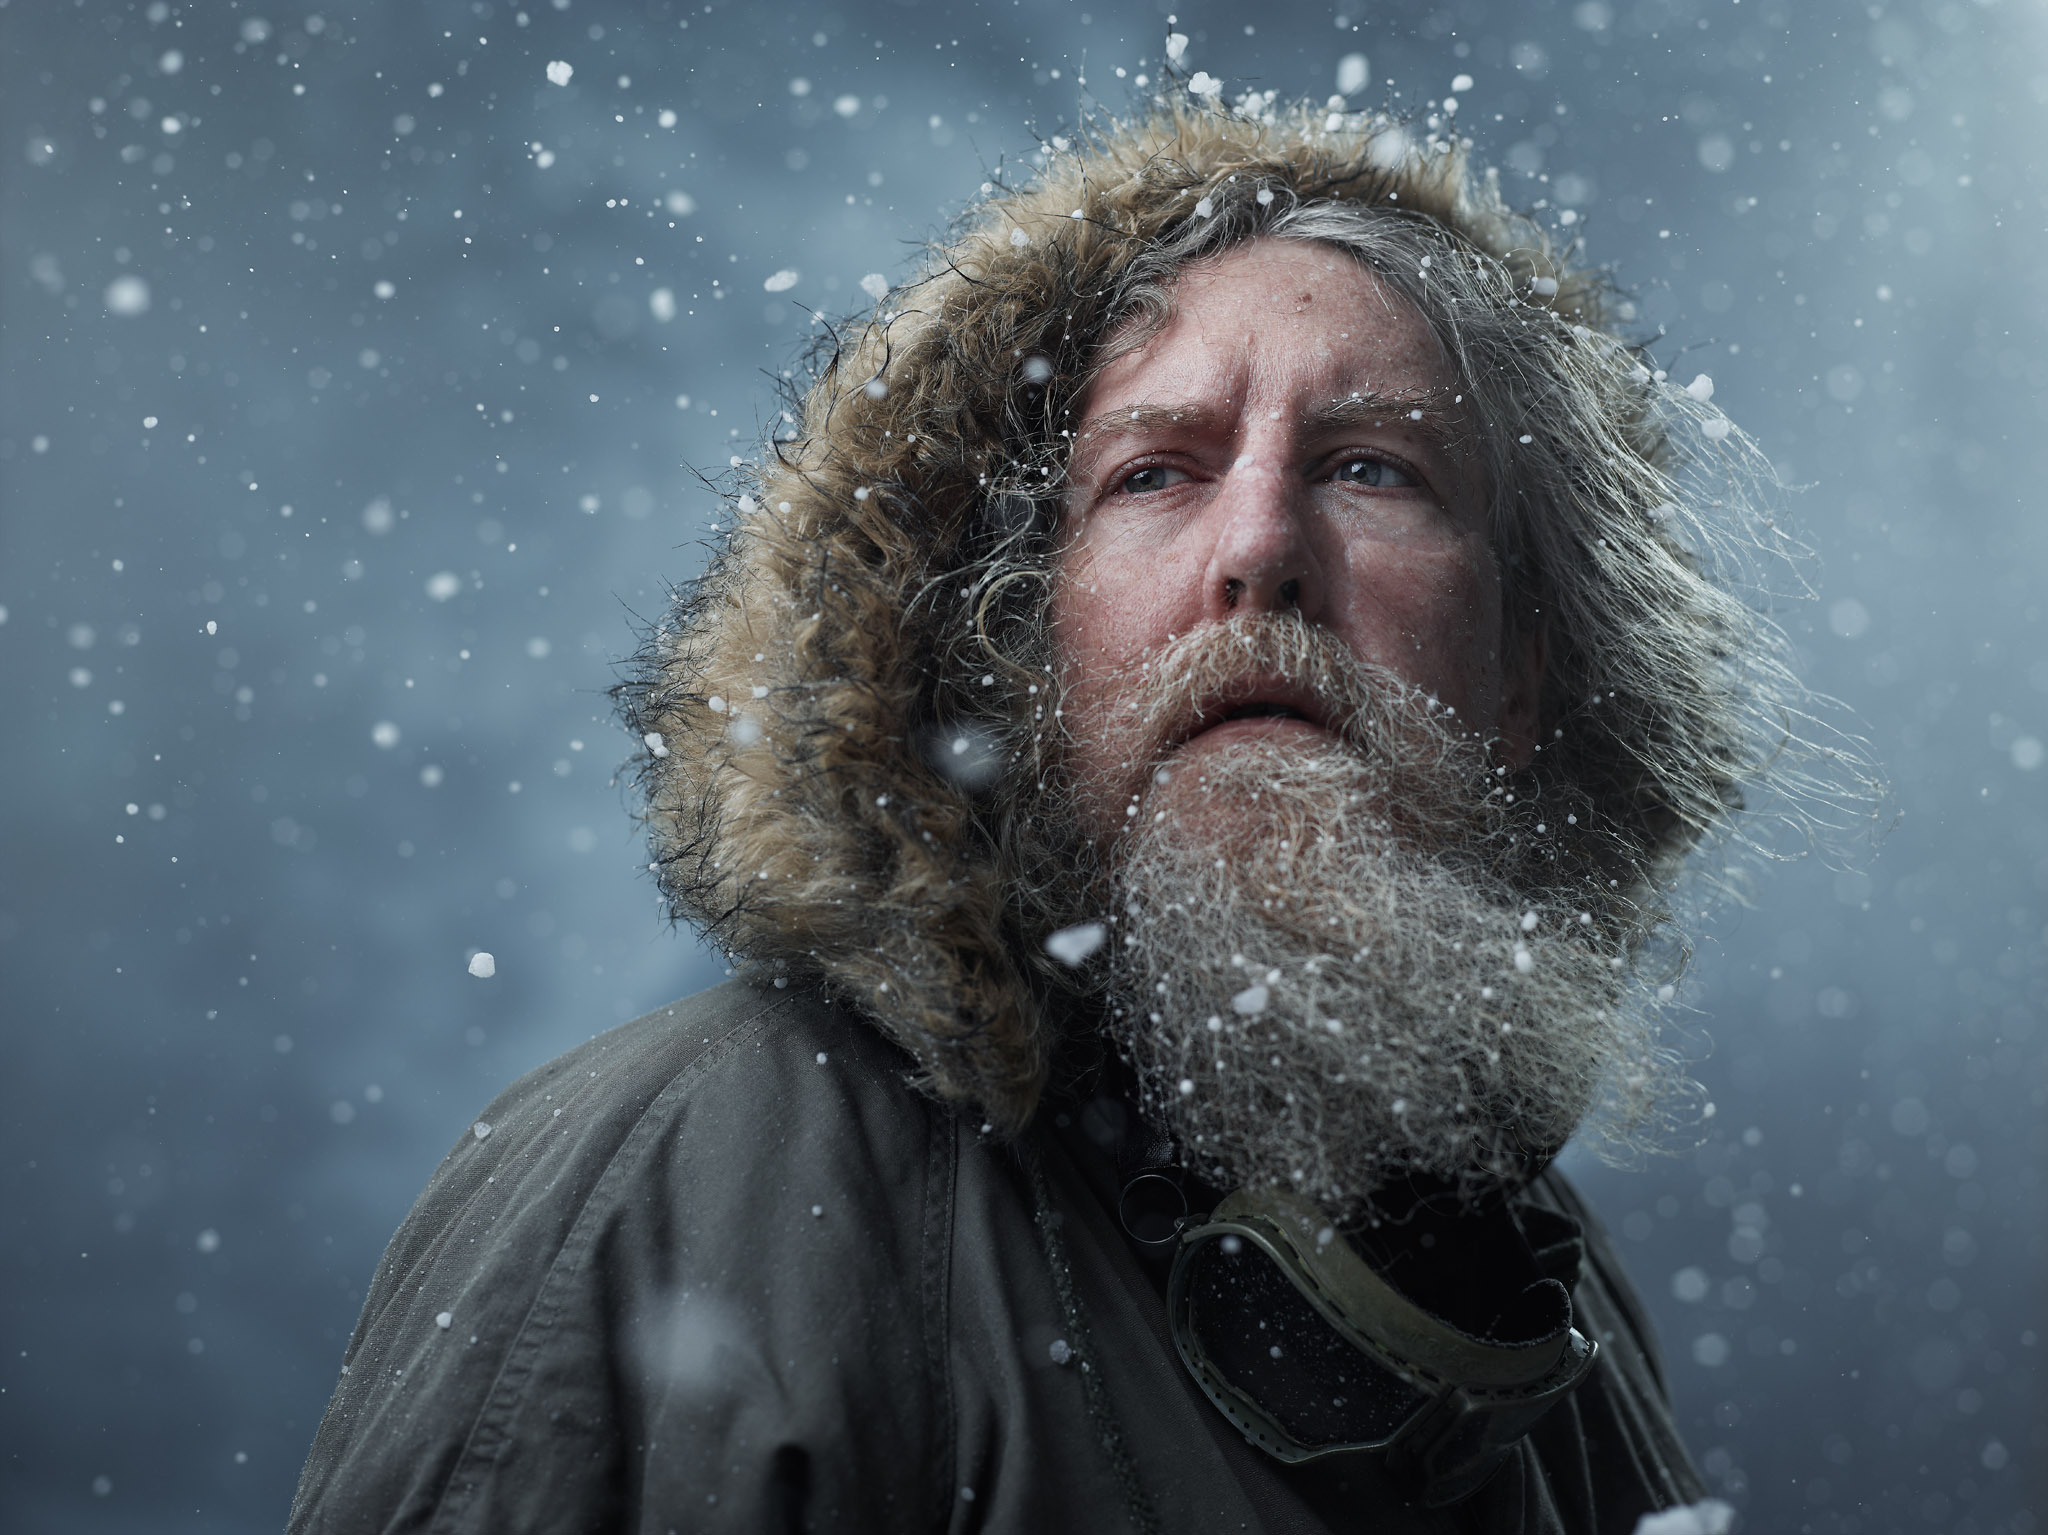
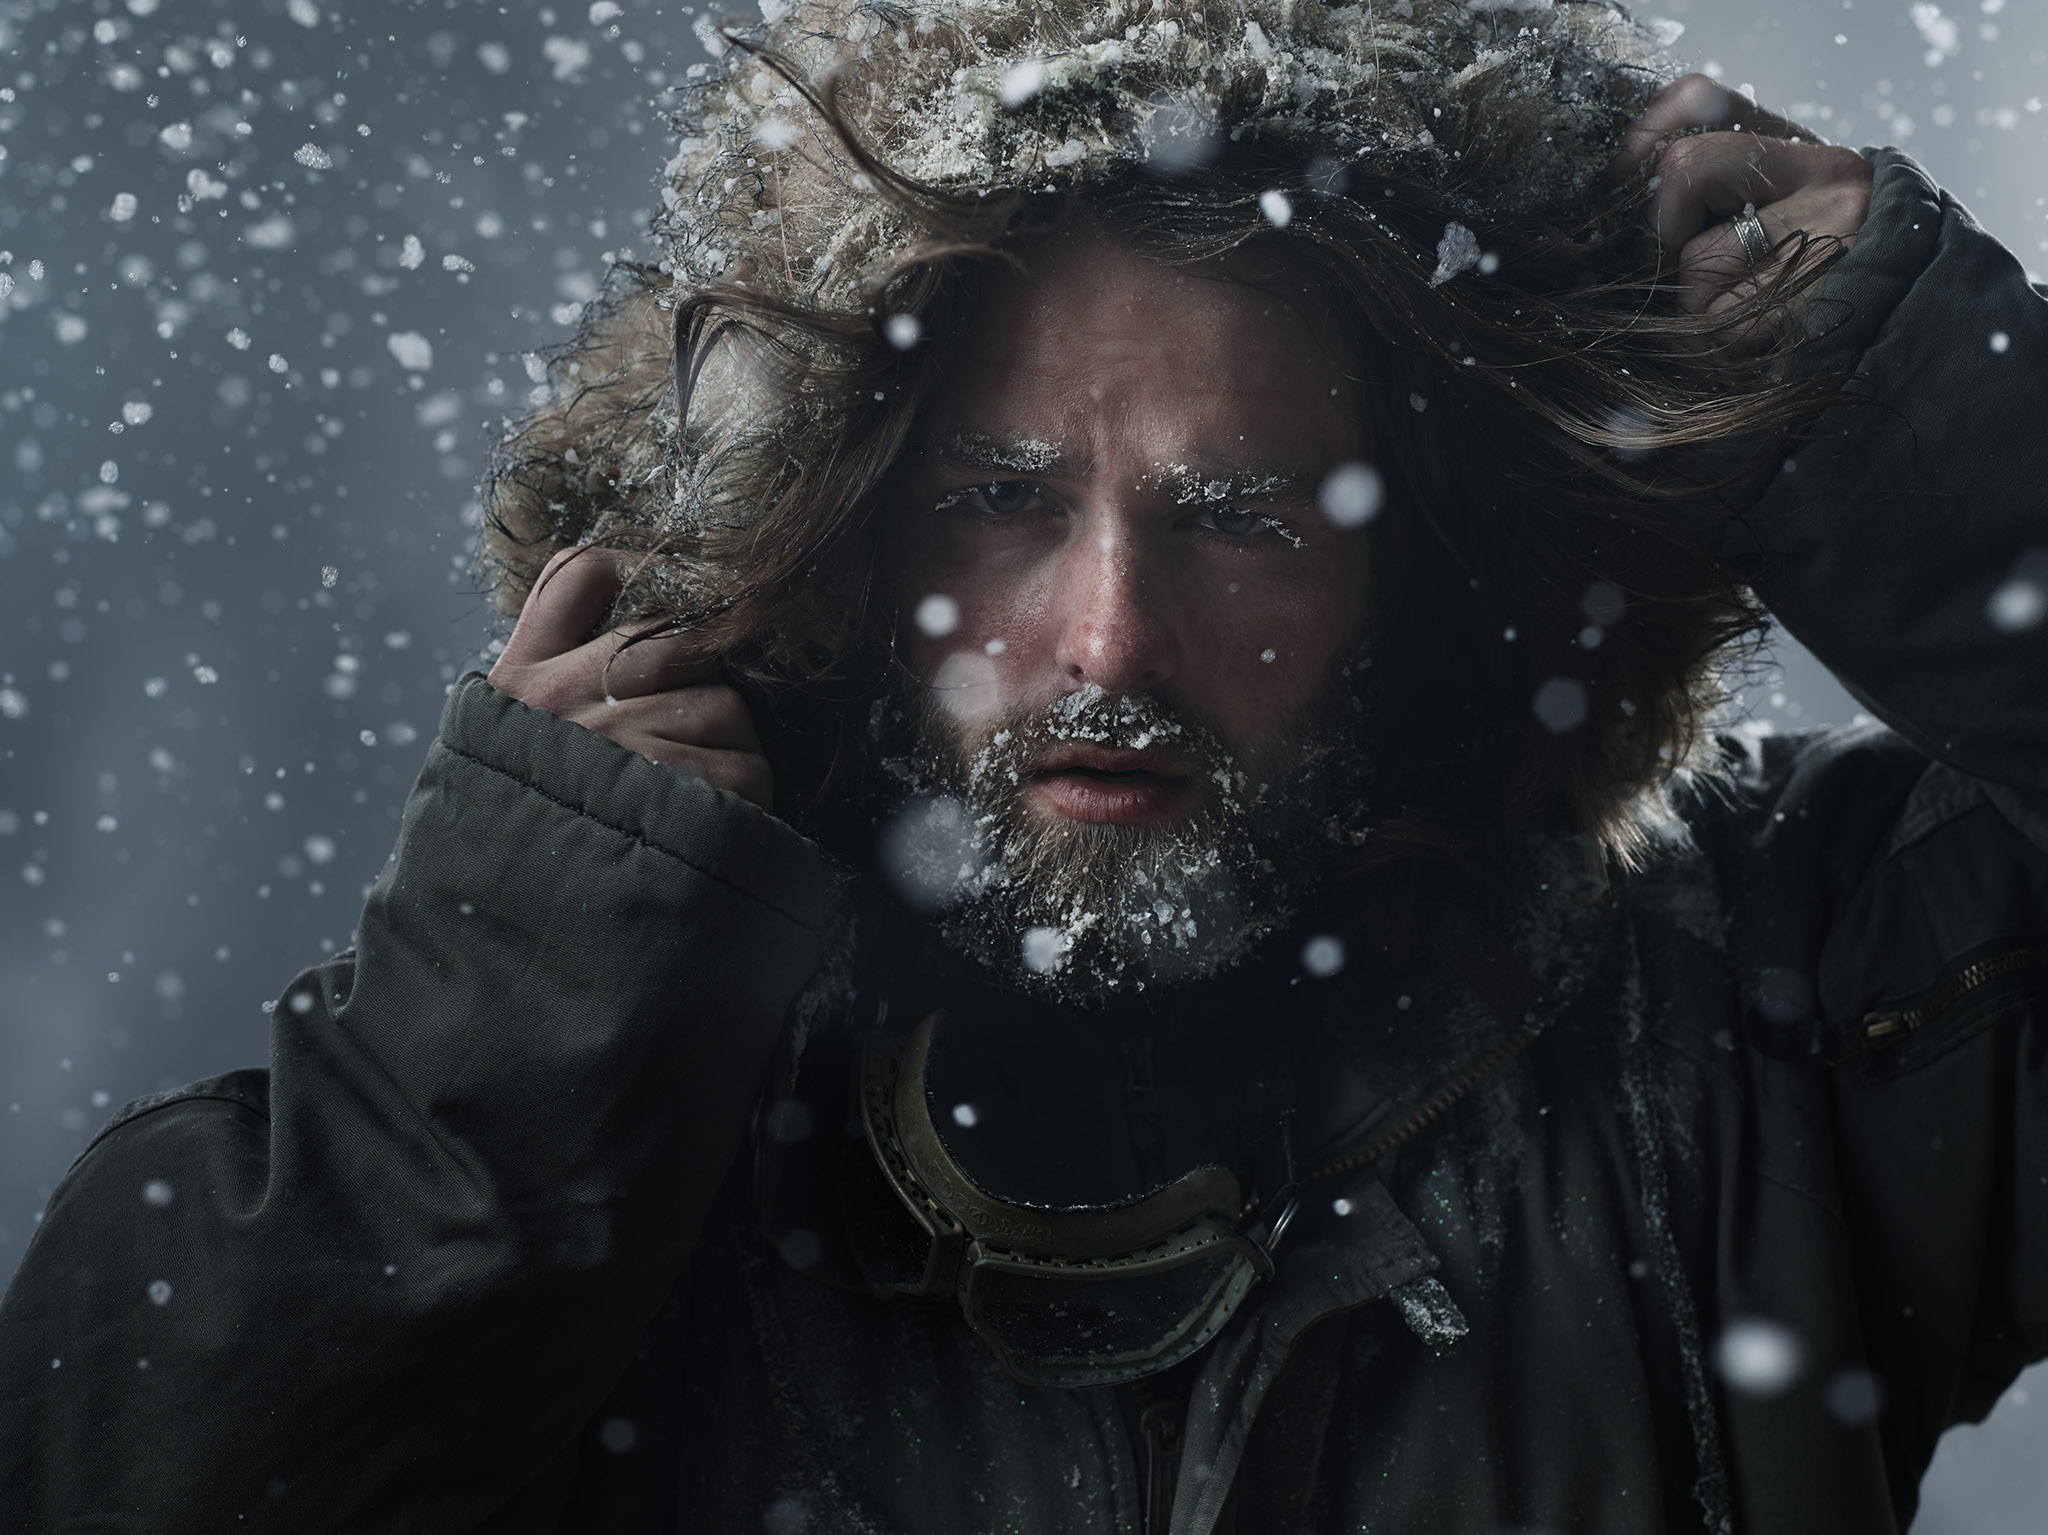
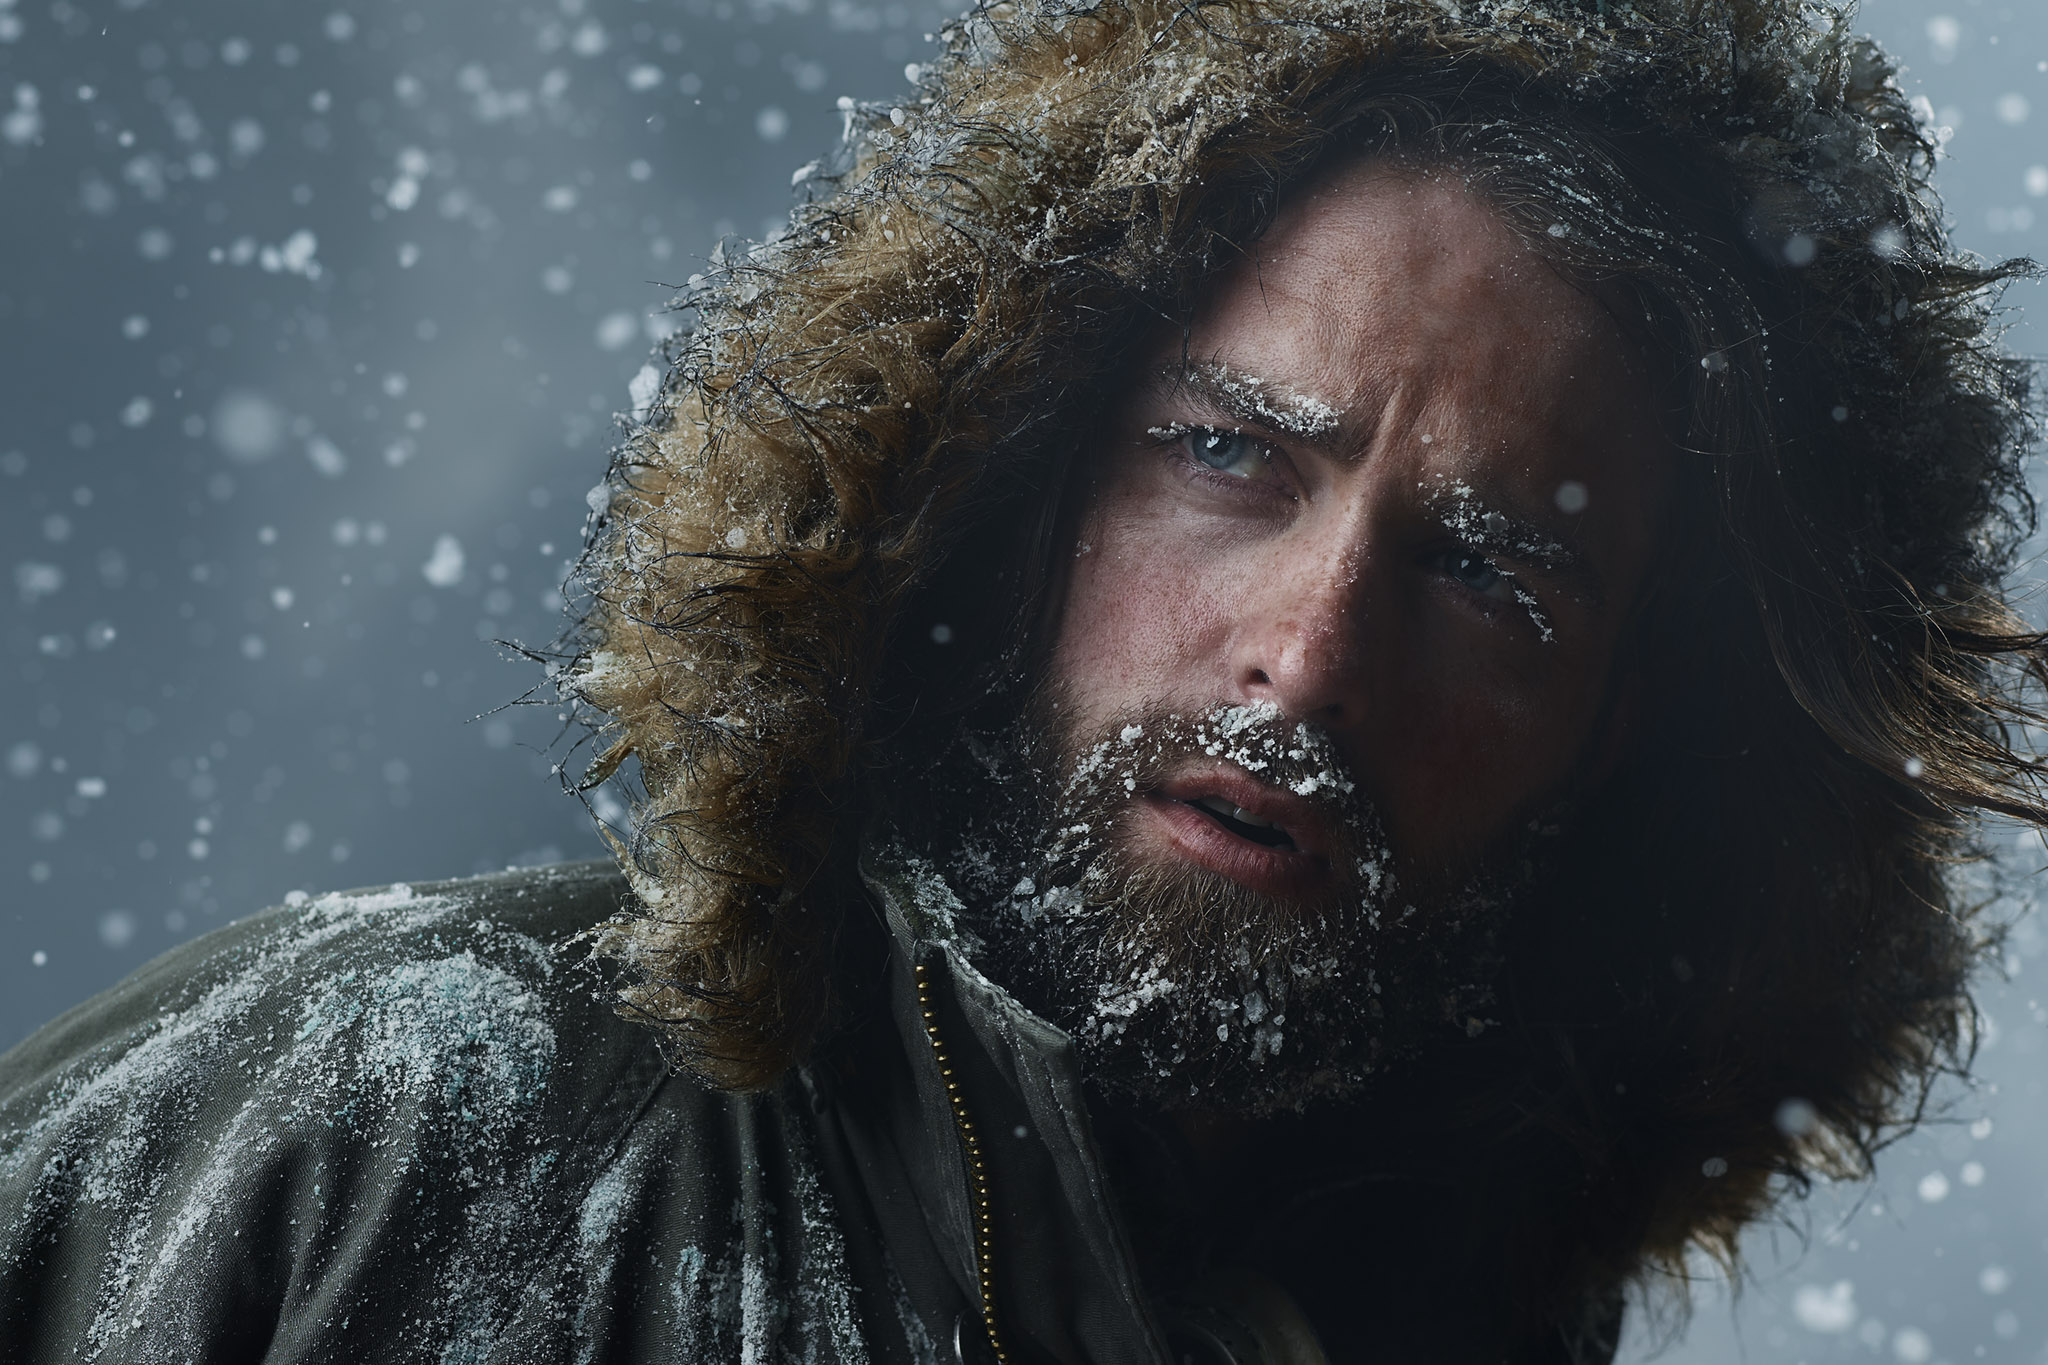
Above: Portrait of Henry Oelkers (Click to enlarge)
I wanted to create a dramatic portrait series of “arctic explorers” which appeared to be taken outside in a blizzard. The concept for this shoot was something I’ve been mulling over for quite awhile, but never had the proper platform to pull it off.
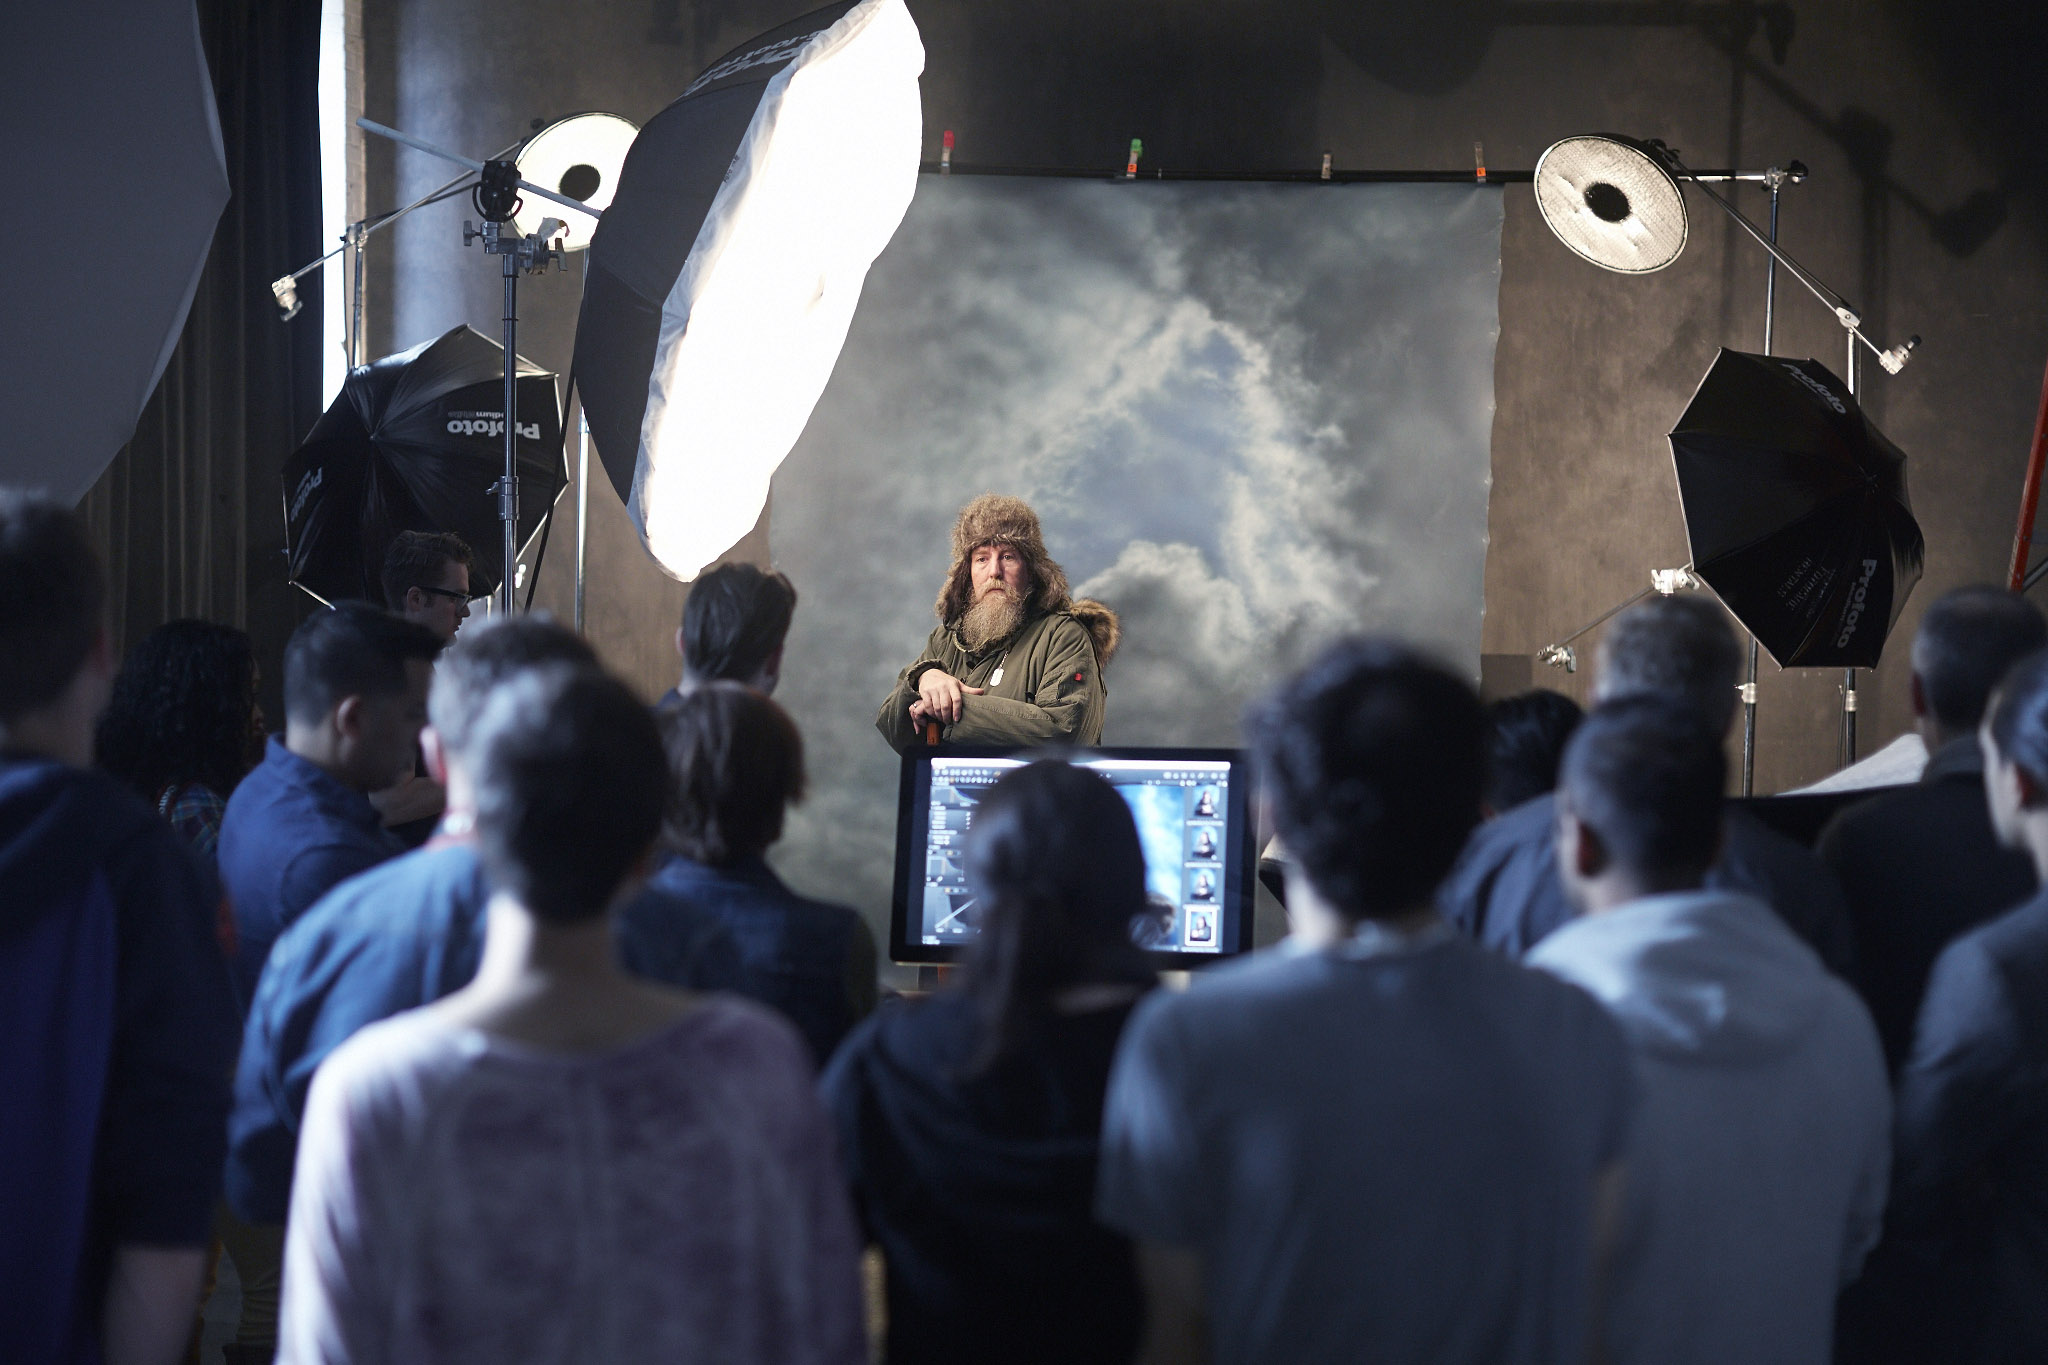
Finally, when I went on a little workshop tour to raise funds for a personal film project of mine, ending with a internet creativeLIVE broadcast, I knew this would give me the resources to pull off something with a little bit of production value.
Creating these portraits in front of a live audience would give my students a taste of how one of my shoots work step by step, but also give me the opportunity to create images I can use in my actual portfolio. I had everything I needed at my disposal- a large space to work in (verrrry tricky to find in NYC), and studio lights, and interesting subjects volunteering their time. Photographing something I was excited about allowed me to be a better instructor because I was shooting something I truly cared about executing to the best of my ability.
Above: Photo by Melissa Fuller
I call these kind of shoots “test shoots” because they aren’t commissioned by any clients. They have one main goal – to push my portfolio further towards the style of photography I want to be hired for. It’s important for me to keep creating new work that isn’t the same as the work I’ve been hired to create in the past, because if I’m only shooting the same kind of stuff over and over, it’s very unlikely that I will be hired to shoot anything else. Over time, if you aren’t proving that you are capable of shooting other things, you might find yourself stuck in a bit of a rut, never really photographing anything new. I like to keep things fresh and progressing forward. It keeps me sane.
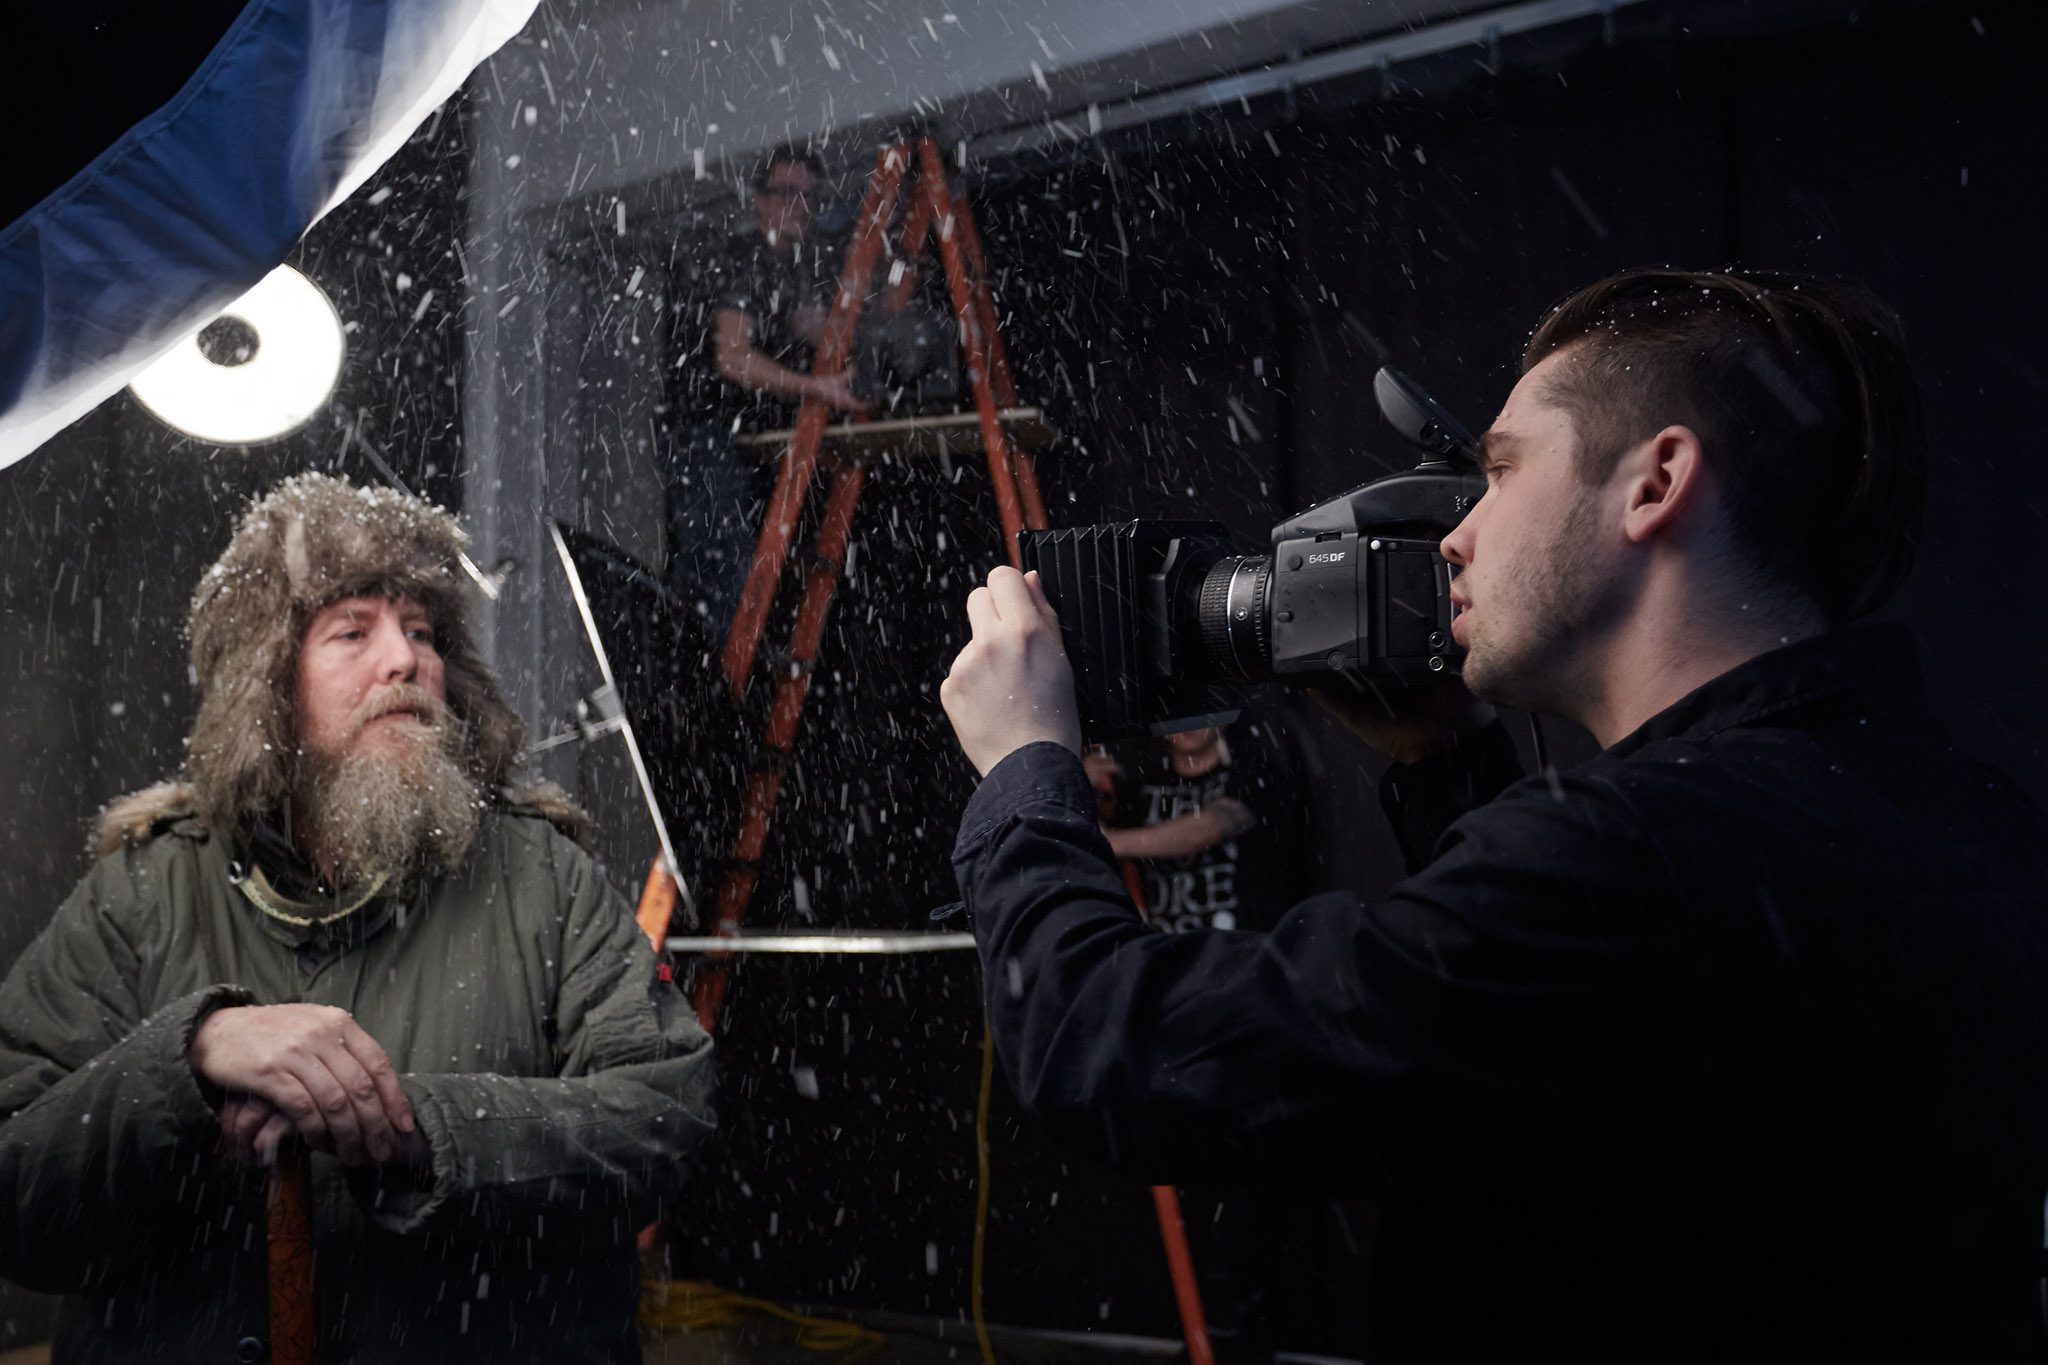
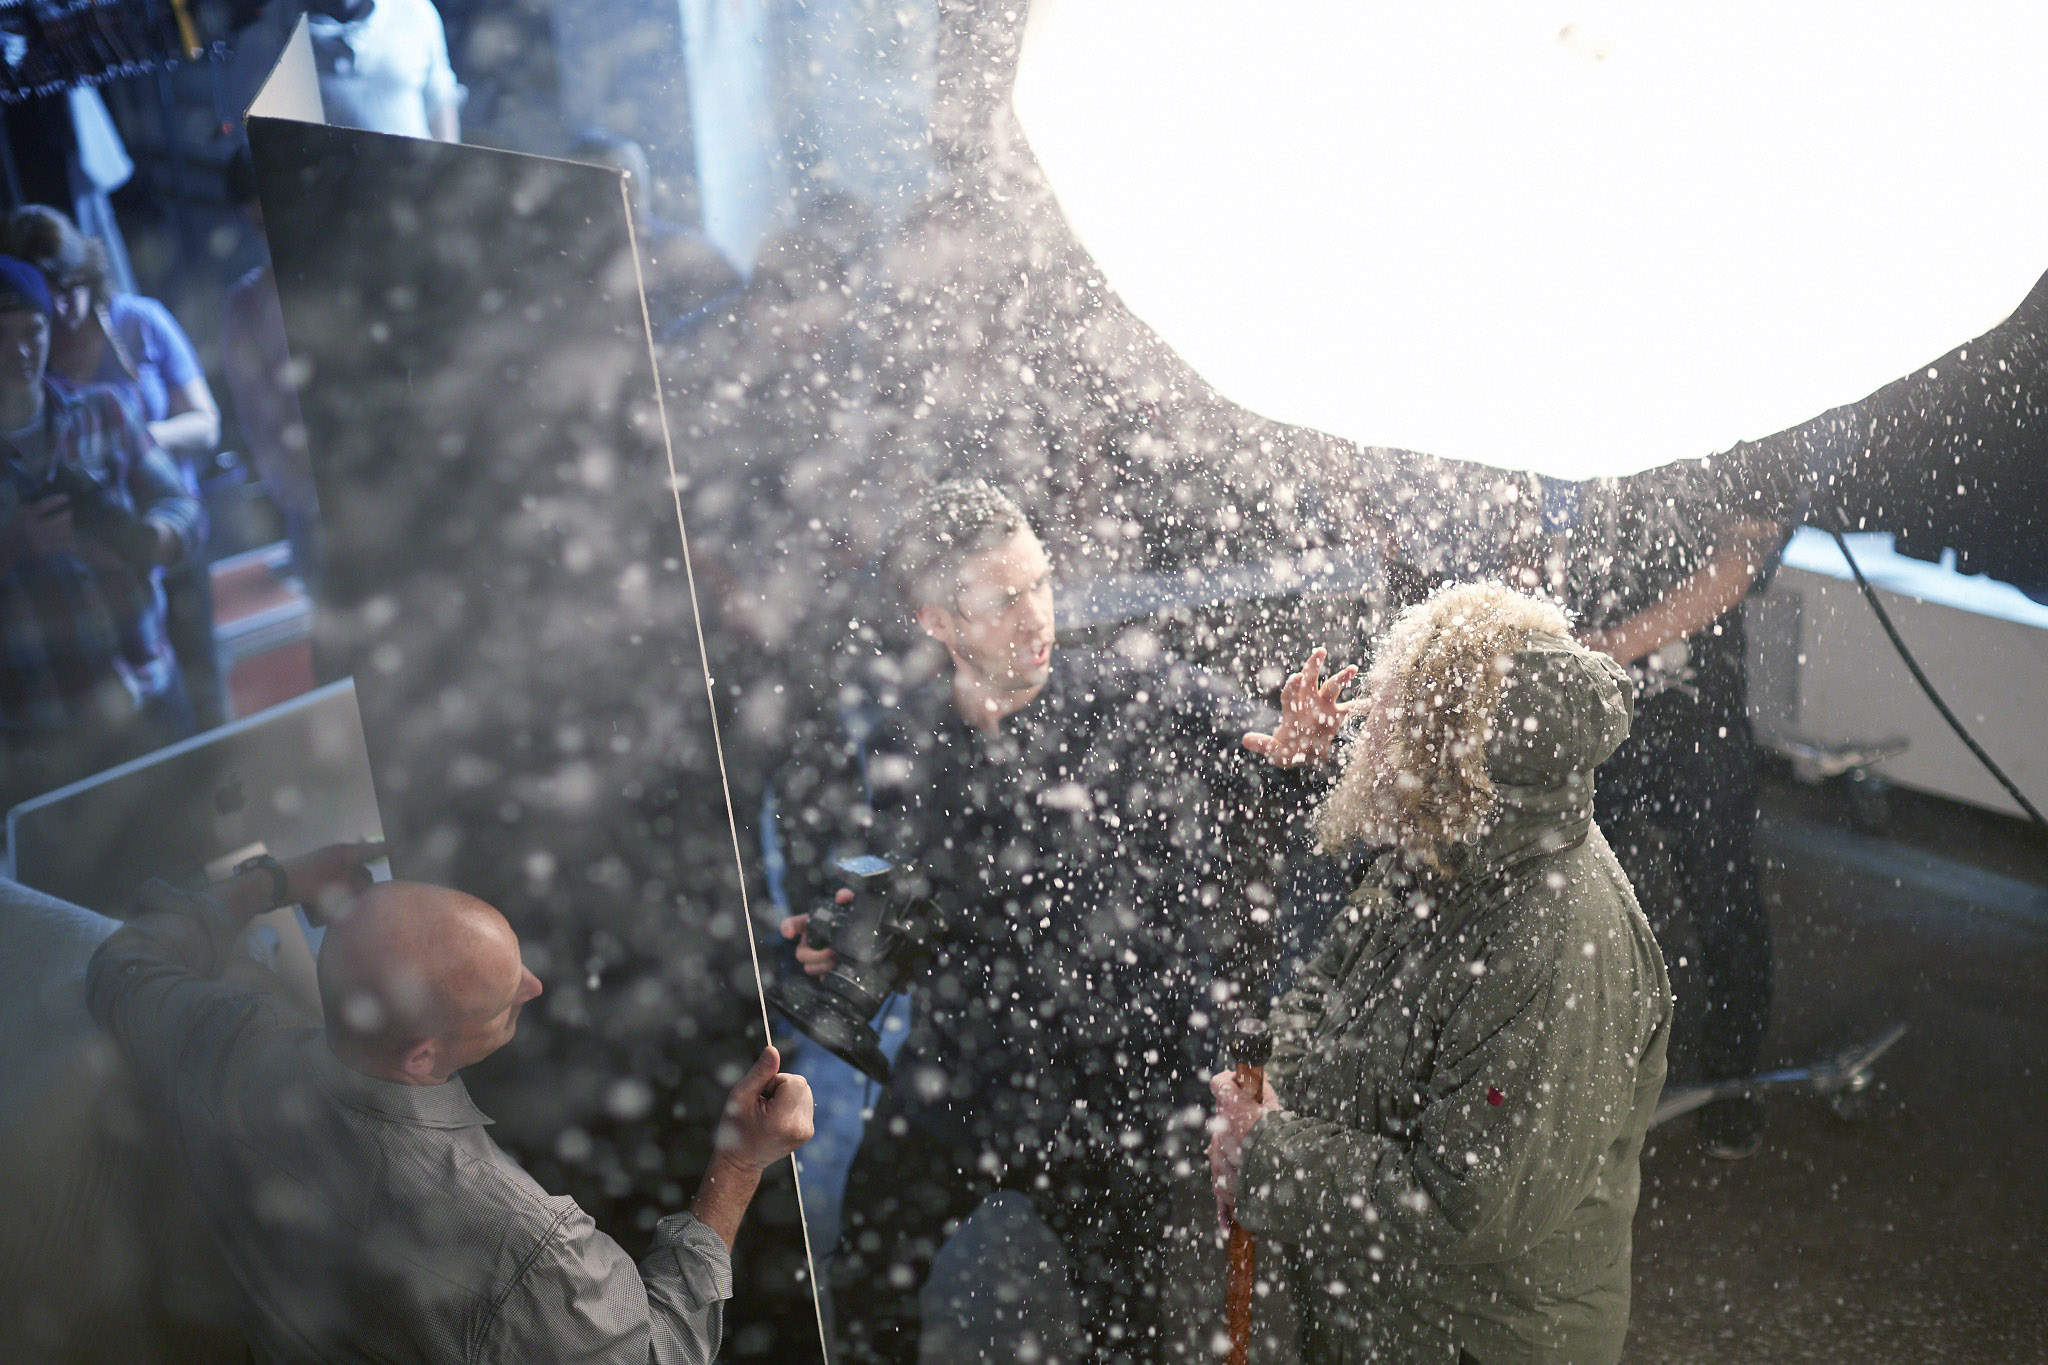
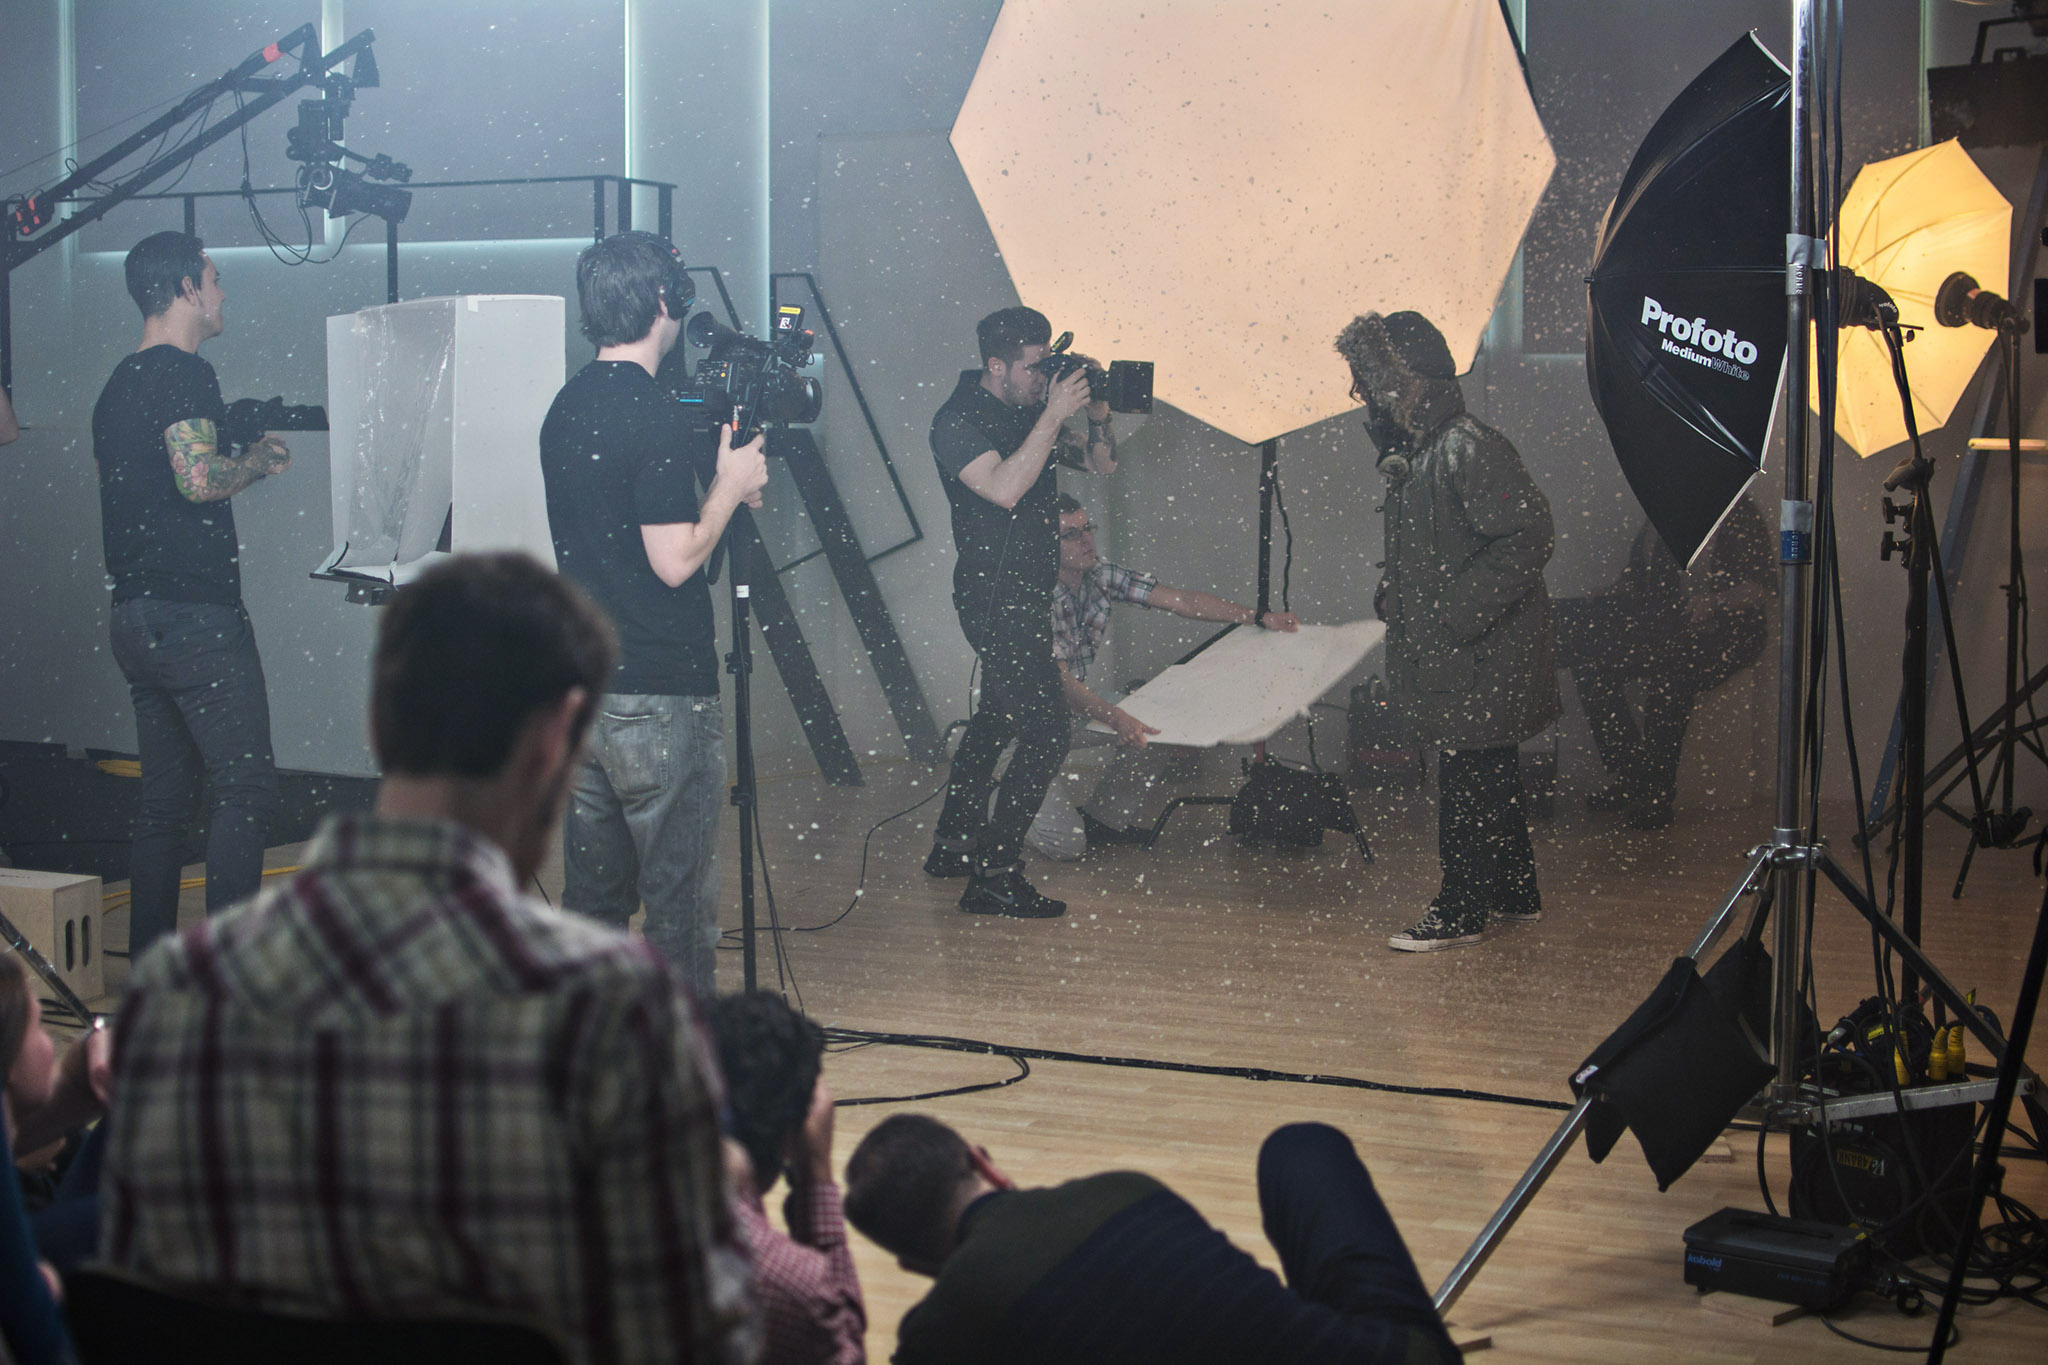
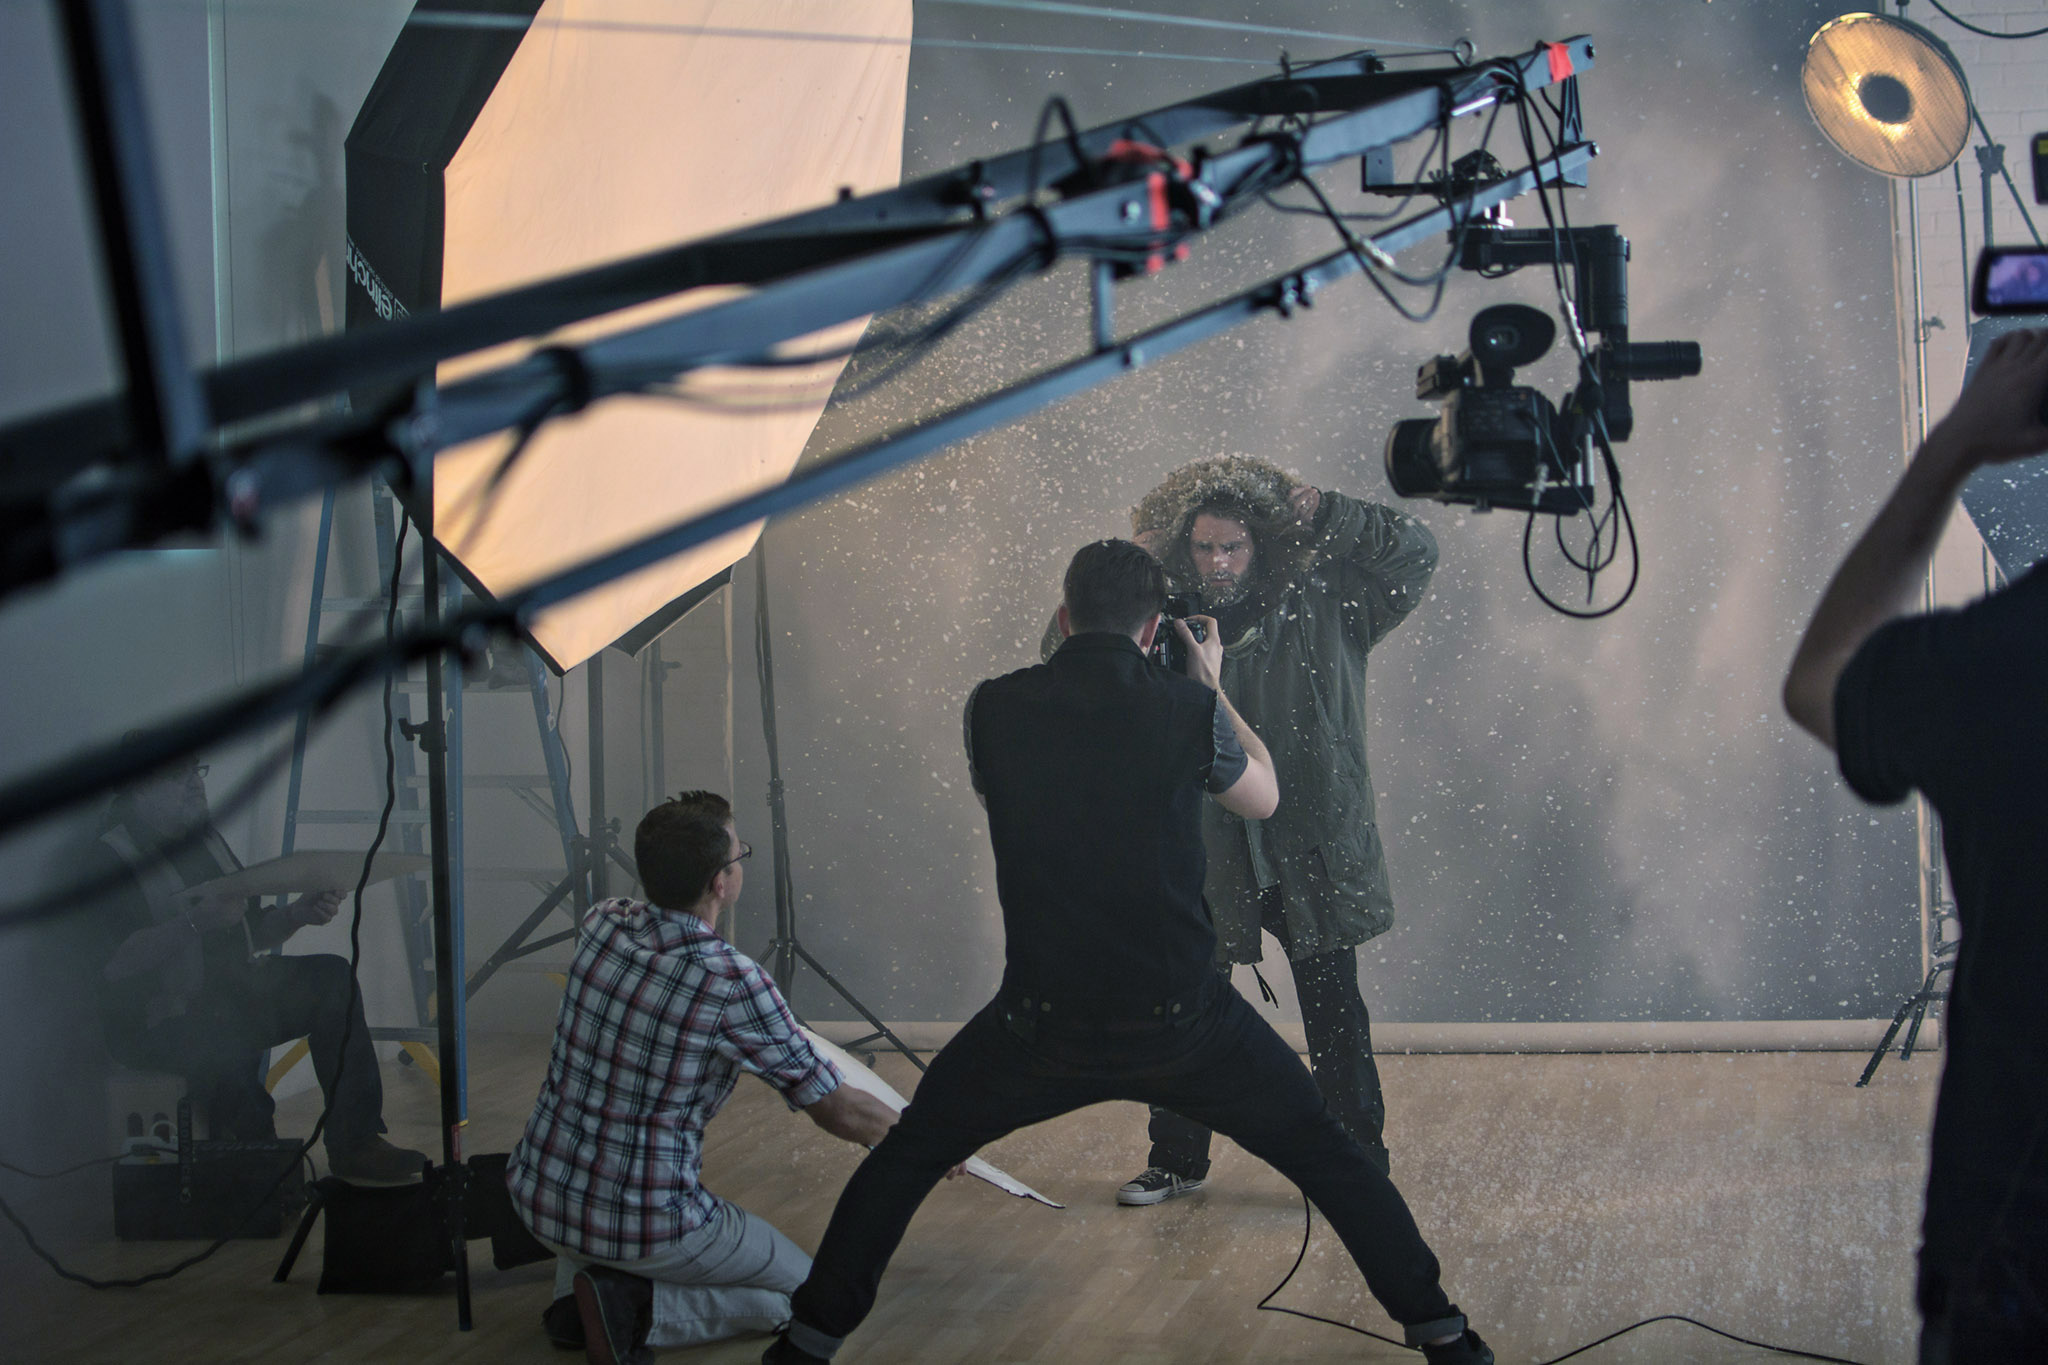
Now, because I decided to create this series in an educational workshop setting, it wouldn’t make sense for me to shoot on location, or even outdoors at all. (I can just imagine bringing 20 enthusiastic students out into a blizzard for a day or two!) Since we weren’t shooting on location and we were fabricating a scene from scratch, we needed to have complete control over the environment. We also needed to be in a comfortable environment in which I could explain every step to the students and pause for questions.
Although it appears to be an elaborate setup, when you break it down step by step, you can see that it’s actually quite simple. The camera is great at lying, especially in close-ups where you only see a small part of the scene. Let’s deconstruct this image first by noting the props that are used, and then later I will explain the lighting.
Each element was carefully fabricated to achieve a sort of visual cohesion throughout each layer of the photo. The subject stands in front of a hand-painted background from Broderson Backdrops resembling a stormy sky. I’m a big fan of getting things right in camera- this is not something I want to add in post later. With this background thrown out of focus, it doesn’t look that different from actually shooting outdoors.
The snow is also a real effect shot in camera. It is created from a American Dj Snow Flurry Snow Machine, which blasts out soap suds that resemble snow, especially when thrown out of focus. I made sure the “snow” was not only falling directly on the subject, but also covering a wide area from behind the model all the way up to my camera lens for a realistic depth of field. After all- in real life the snow would be falling both in front of the camera, and behind. I was surprised to find out after my shoots that these snow machines are actually quite cheap… In fact, at $108.98 on Amazon, it would have actually been cheaper to buy the machine than to rent it for just two days.
Another special effect used in these photos is the haze from a haze machine. This atmospheric layer of fog added a little bit more depth to the background, and allowed us to see some flare from the backlights, as if the sun were caught in the blizzard’s drift. Because the haze likes to come out of the machine a bit directional, I had what I like to call “waft man” fanning the haze so it would spread evenly throughout the set. I made a poor student do this at each workshop, and I’m sure their arms ached the next day.
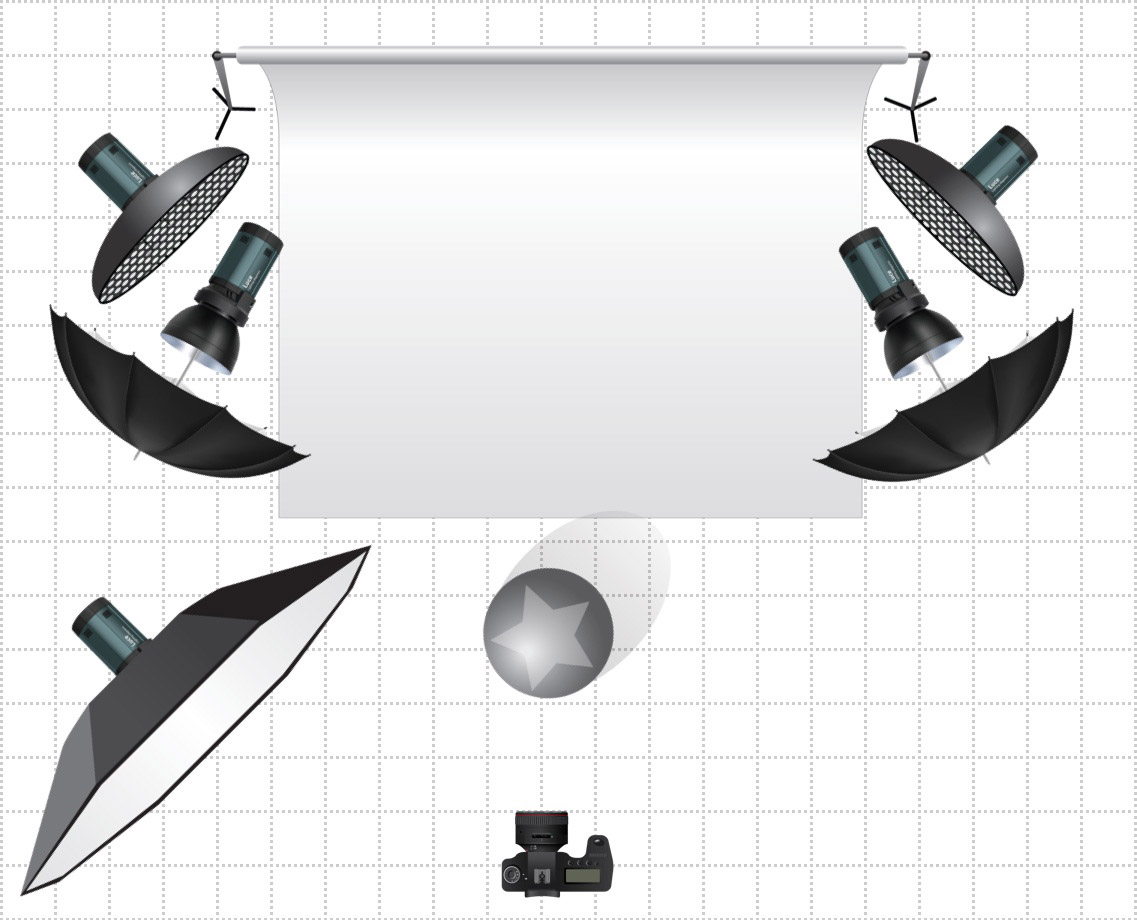
Camera: Mamiya 645DF with P65+ Digital back
Lens: 80mm f/2.8 lens
Light Heads: Five Profoto ProB Heads
Power source: Three Profoto 8a 1200 Air Power Packs
Main Light: One 74″ Elinchrom Octa Light Bank
Backlight: Two White Beauty Dishes with 25 Degree Honeycomb Grids
Background lights (lights hitting backdrop): Two 41″ White Profoto Umbrellas
Backdrop: Broderson Hand Painted Backdrop
Haze Machine: American DJ Haze Generator
Snow Machine: American Dj Snow Flurry Snow Machine
I like to light in layers and be able to control each source individually. Let’s start with the main light – a large 74” Elinchrom Octabank modifier being fitted to a Profoto head and pack. In some of these photos, a Profoto-equivalent octabank was used, but I much prefer the quality of light from the Elinchrom.
Next, there are two white beauty dishes as backlights which light the subject and falling snow from behind with a soft, wrapping light. Rather than have the two beauty dishes set at an equal strength, I preferred to have one slightly brighter than the other. This added to the realism and motivated more as one sun coming from one side. I imagined the sun trying to peak through the layers of falling snow, and being diffused.
Finally, there are two white umbrellas turned on to the painted backdrop, set at the same strength. These are there to light the background evenly, and were plugged into their own individual power supply. This way, I could increase or decrease the exposure of the storm clouds in the background based on preference.
The subtle balance between these different lights and special effects is what truly counts. If the background gets too dark, it will not match the foreground, and vice-versa. When we brought together all these different elements in camera, it left me with very little photoshopping to do.

Above: Portrait of Summer Rayne Oakes (Click to enlarge)
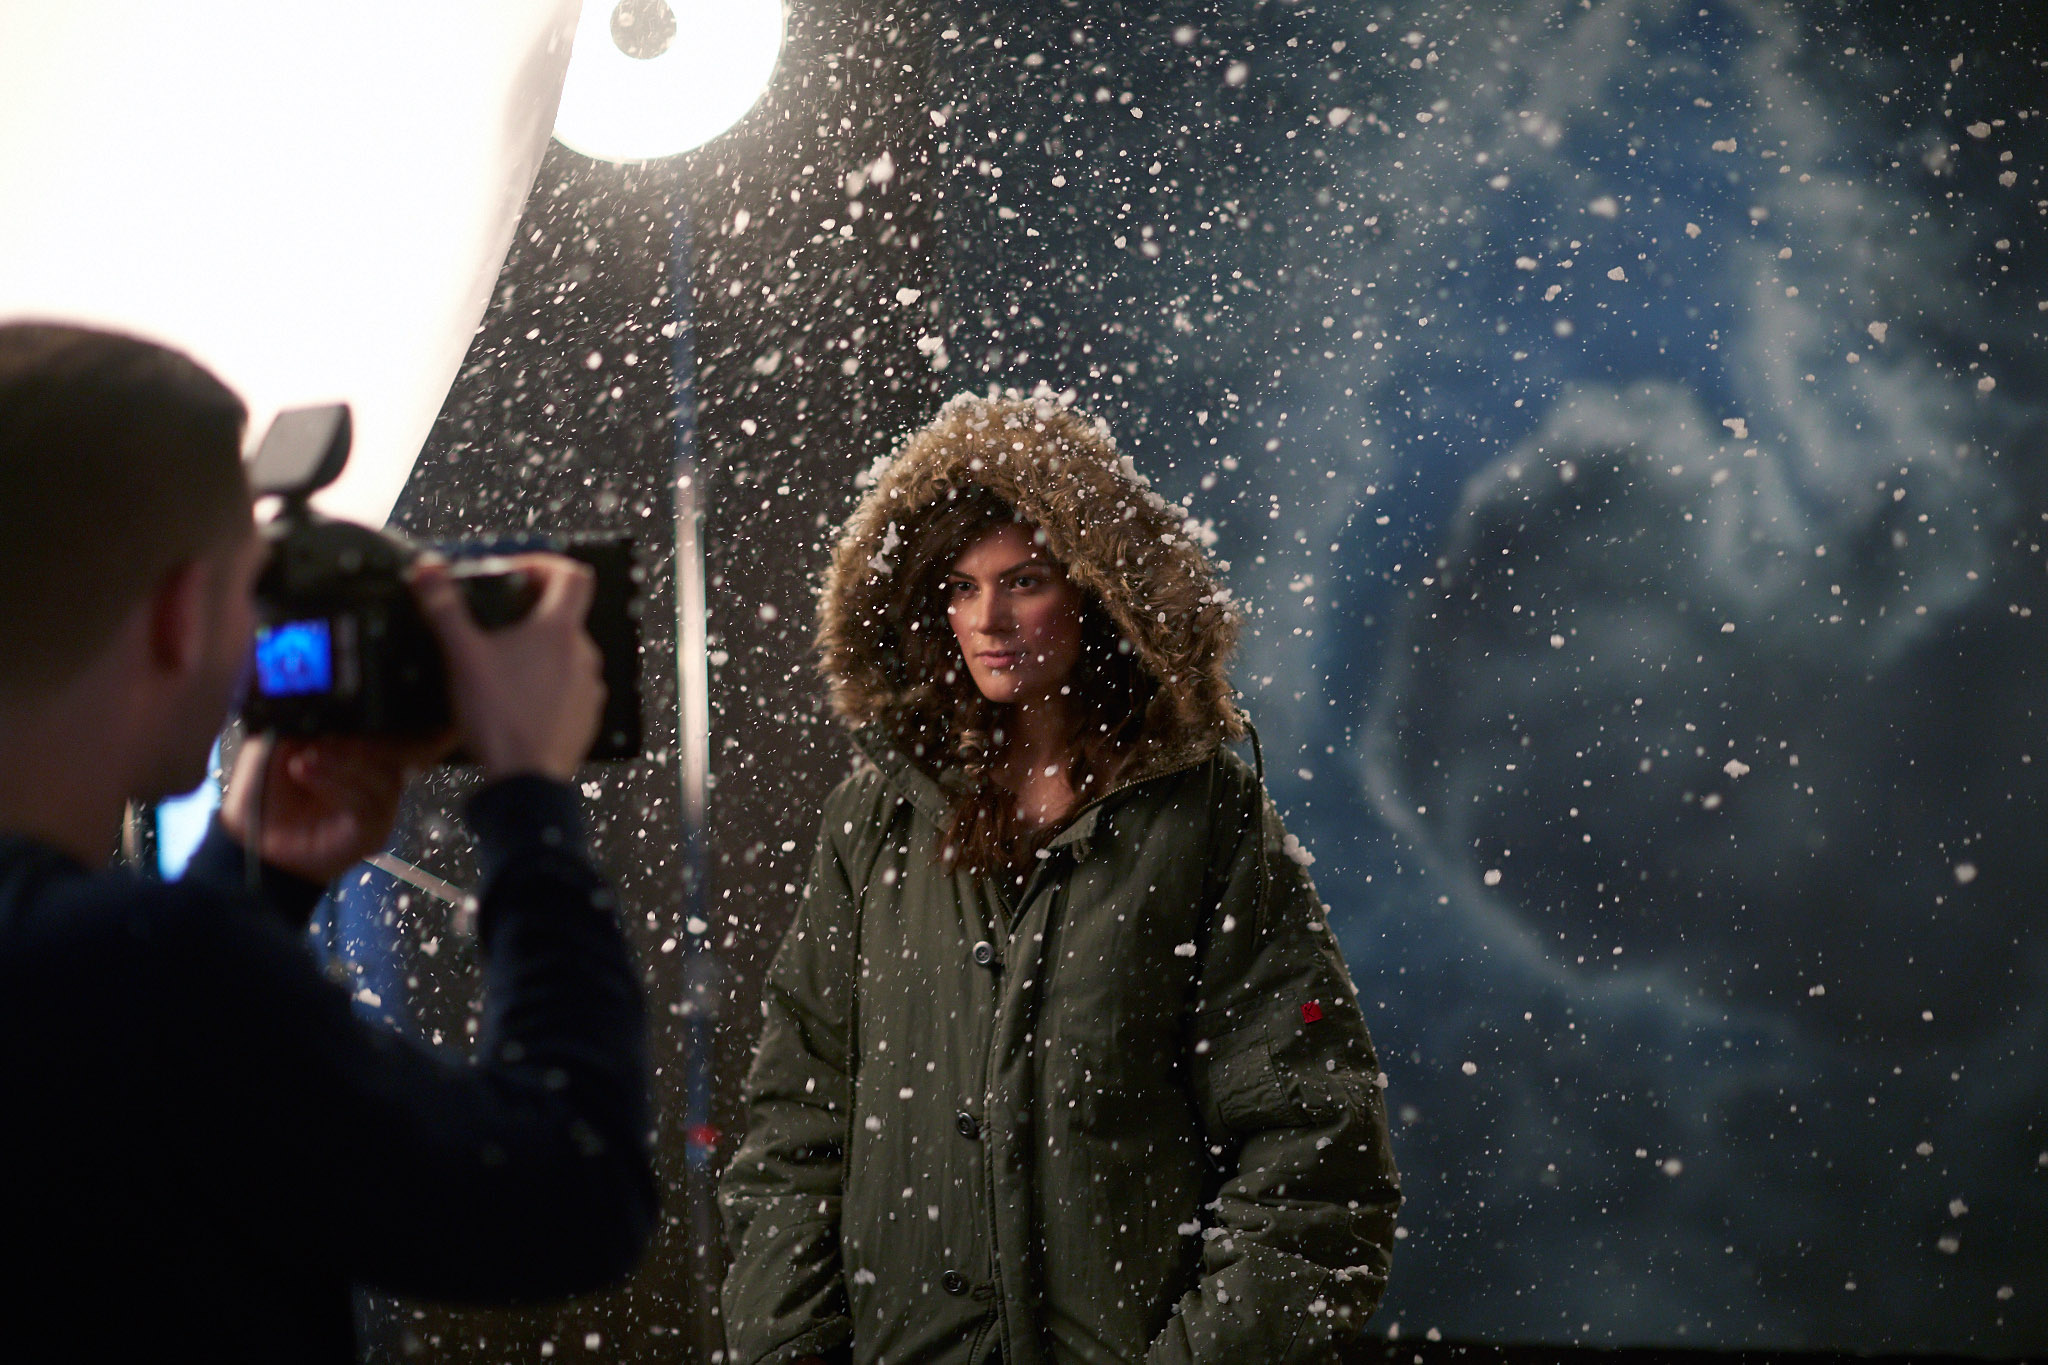
As I shot, I had to keep an eye on the technical aspects, but more importantly, I had to make sure my subjects had engaging expressions. By posing them dramatically to look as if they were moving or looking for something, I was able to achieve a more dynamic image.
The make-up was slightly different with each subject and got a little more complicated as each workshop progressed. Our first subject, Henry, didn’t have any makeup. The only “snow” on his coat came from turning him towards the snow machine before shooting, and then having him stand back in place. Summer Rayne Oakes, our second subject, had her makeup done to look like she was a little more weathered, but still, no “snow” other than what came from the snow machine. For our third setup with Brett and Terra at creativeLIVE, we got a little more advanced with the makeup and visual effects by adding some “ice” to the face, and some finer snow particles to the jacket.
Above: Portrait of Brett Cherry, who is actually creativeLIVE’s set designer!

Above: Portrait of Terra Clark
Photographing this in front of a live audience was a daunting task. Sometimes things don’t look as good as you envision them at first. You have to tweak and tweak and teak until you finally achieve what you set out to do. I think the most interesting parts of the shoot to the students of the workshop were actually where I failed at first, and overcame the mistakes step by step. Since I had a clear vision of the final image in my head, full control over the set, and knew what each light was doing, it was very easy to progress from the messy test shots and create the image I had imagined. Normally in photo shoots my process is very mental. Here, because it was a educational environment, I had to stop and explain things along the way. This was a very interesting exercise for me, and I’d certainly consider doing it again in the future.
Above: Segment from my 3 day course “Commercial Portrait” on creativeLIVE
If you missed out on seeing this whole photo shoot take place live on the internet, you can actually watch it (along with four entirely separate shoots and hours of me talking about lighting, photoshop, and much more) by downloading the entire creativeLIVE course directly from their website.
Even with a photo as “complex” as these blizzard portraits, when you break it down piece by piece, light by light, and effect by effect, it becomes quite simple. As I say in the creativeLIVE broadcast, if you can fully understand the way one light is affecting your image, it’s likely that you can understand one million lights.
JL
ADD A COMMENT (38)
Gamaliel Rios // June 13, 2013 21:26
Simply awesome and inspiring in every level, there's no shortcut, just hard work and great results. Thanks Joey for being a major inspiration.
Carmen and Ingo // June 13, 2013 21:30
amazing stuff dude! fantastic live performance! way to go!
Reza Evol // June 13, 2013 22:27
Incredible Joey! Simply Incredible.
Ihab Mokayed // June 13, 2013 23:12
You are such an inspiration for me, I really look up to you and your work!
Brian Muntz // June 13, 2013 23:28
these shots are epic man! amazing work!
Nicola Tröhler // June 14, 2013 00:05
Saw this setup at creativeLIVE, was a great show! Thank you!
Greetings from Switzerland!
Lighting a Portrait With Lindsay Adler - The Phoblographer // June 14, 2013 00:27
[...] Joey L just did something [...]
Juan Carlos // June 14, 2013 00:36
fantastic, good job¡¡
Philippe // June 14, 2013 03:06
I watched your CreativeLive shoot live on the internet and it was very inspiring. Thanks for sharing your insights. All the best from Scotland.
Dave Alexander // June 14, 2013 04:04
Amazing as always, love reading your stuff and seeing your BTS stuff. One question though, in your setup list you mention 5 ProB heads being used with a Pro 8A 1200, is this correct? I was under the impression that Profoto studio generators (7a, 8a etc) would only take Pro heads, but not ProB's?
victor // June 14, 2013 04:41
Great work, awesome, I love the way you plan and also was great learning experience to watching you at CreativeLive show, keep on Joey!
williamcl // June 14, 2013 08:46
wow.. such an amazing pictures.. i happened to be a photographer myself even though still a beginner.. please check out my blog and give some feedback if you have some spare time.. thx..
williamcl.blogspot.com
A Stormy Blizzard » Chic Glamorous and Splendid // June 14, 2013 19:59
[...] behind the scenes video is not to be missed. Â Please click here to view all the images from the [...]
Joey L. Creates Indoor Blizzard For Unique Portraits | Fstoppers // June 14, 2013 22:42
[...] To read more about this shoot and see additional behind the scenes photographs definitely check out Joey L’s blog post. If you would like to see the entire shoot along with lots more instruction by Joey L you can [...]
How to Create an Indoor Blizzard | FilmmakerIQ.com // June 15, 2013 04:44
[...] I wanted to create a dramatic portrait series of “arctic explorers†which appeared to be taken o... [...]
qing_hui // June 15, 2013 06:36
Gosh. This is so cool. Definitely will keep my eyes on this blog though im not really into photography.
Jeffrey // June 15, 2013 11:39
Great work JL!! I'm glad I was able to see it happen live. I can't wait to see the ones from the forest theme.
Luca Z. // June 16, 2013 13:35
WOW!!! Fantastic! Thank Joey
adam sund // June 16, 2013 16:30
Amazing work. A thing that puzzled me, which I didn't find mentioned in the text above is the usage of ND(?) filters. Is this mainly so you can use a different aperture?
Pascal // June 16, 2013 18:53
did you used your lee nd filter also with this shot in the studio?
or did you only used the lens hood for keeping the fake snow away?
thanks!
az photo news | Creating an Indoor Blizzard for Portraits with Falling Snow (Peta Pixel) // June 17, 2013 18:21
[...] About the author: Joey L. is a Canadian commercial photographer, director and published author based in Brooklyn, New York. Visit his website here and his blog here. You can also find him on Twitter, Facebook, and Google+.This article was originally published here. [...]
Przemek Wróbel // June 17, 2013 22:39
WOW, perfect work, and lots of light is used :)
Ullamaron // June 22, 2013 23:10
really nice. your photos like in the movies.
N i n e - V o l t // June 25, 2013 19:39
[...] is really the best part of the post. Below is a BTS video but be sure to check out his blog post here to read what he has to say and also see the many BTS [...]
Profoto Blog Leave Summer Behind with this Snowy How-To from Joey L. » Profoto Blog // July 11, 2013 11:25
[...] On his blog, Joey details how he got the shot with behind the scenes pics, a lighting diagram, and some insight into his thought process. Although the shoot looks complicated, he used 5 Pro-B Heads, 3 Pro-8a packs, and a variety of lighting modifiers, he explains how every piece has its place. [...]
Doktor // July 12, 2013 02:11
does this look good? Or like anything? It looks like prduction value, and personal project, yeah thats true.
Thanks for the background and technicality though
Hello world! ‹ Dennis Webb Jr. // September 10, 2013 18:21
[...] http://www.joeyl.com/2013/06/creating-an-indoor-blizzard/ [...]
yvonne willemsen // November 21, 2013 10:35
Hi Joe
I have been watching you for years...ever since we were on the same website years ago. I believe you actually emailed me about a psychiatric hospital that you shot on Toronto. I was curious as to it's whereabouts. Congratulations on all your success..it was not hard to see your amazing talent, even back then.
Dan // November 23, 2013 09:23
Beton!
A winter blizard indoors - // February 18, 2014 01:10
[…] Creating an indoor blizzard → […]
Behind the Scenes: Creating a Boudoir Photography Studio » Boudoir Photography Rebel & Romance // February 27, 2014 18:51
[…] Sure, it’s a little complicated. But it’s much, much easier that you and I flying to the Alps, praying for snow, hiring a Sherpa to carry all my equipment, and then trying to create beautiful images with numb fingers and frostbitten toes on the side of some mountain. If you’re a photographer and also inspired by this setup, there’s a great blog post about the full process and resulting images here: Â http://www.joeyl.com/2013/06/creating-an-indoor-blizzard/ […]
Vaughn Barry // March 14, 2014 21:15
Stunning, love the light, depth and crazy-sharpness Joey!
Xanthe // April 11, 2014 20:09
Very nice setup and effects! Excellent work guys!
Sheri // May 10, 2014 09:37
Hi there, this weekend is pleasant for me, as this
point in time i am reading this great informative paragraph here at my
residence.
Brian Davis // November 07, 2014 21:02
Wow...love behind the scenes stuff like this. I didn't even know it was possible to do this, but you actually made it look easy...and fun!
fotografo de boda en malaga // November 23, 2014 15:00
thnak you for show lights and effects, congratulations, incredible portrait, 10
Pascal // January 08, 2015 04:30
They look all so absolutely amazing! WOW!
Thanks for showing.
Marcela Gerling // January 28, 2016 06:19
hi, where do you buy the backdrops?
Your comment has been posted